How to Change Your Name on a Macbook Pro
How to Change Your Name on a Macbook Pro
![]()
Apple
People wind up with a new name, often one that better reflects who they are or have become, for all sorts of reasons. macOS can keep up with the name you use, so you aren't staring at your past identity indefinitely. It's not obvious, but you don't have to dig into the guts of macOS, either. Just take care to follow steps carefully.
There are a couple of requirements:
- You can't change the name of an account while logged into the account you're changing, so you have to have least two accounts on the Mac.
- You must have administrative access from the account you log into to change the other account's full name.
Warning! As with anything involving system-level changes, I strongly recommend initiating a manual Time Machine backup or updating a clone on an external drive in case something goes wrong.
It's easy to set up a new account in macOS:
- Open the Users & Groups preference pane.
- Click the lock icon at the lower-left corner and authenticate yourself.
- Click the + (plus sign) at the lower-left corner to add an account.
- Fill out details, but be sure to choose Administrator from the New Account pop-up menu.
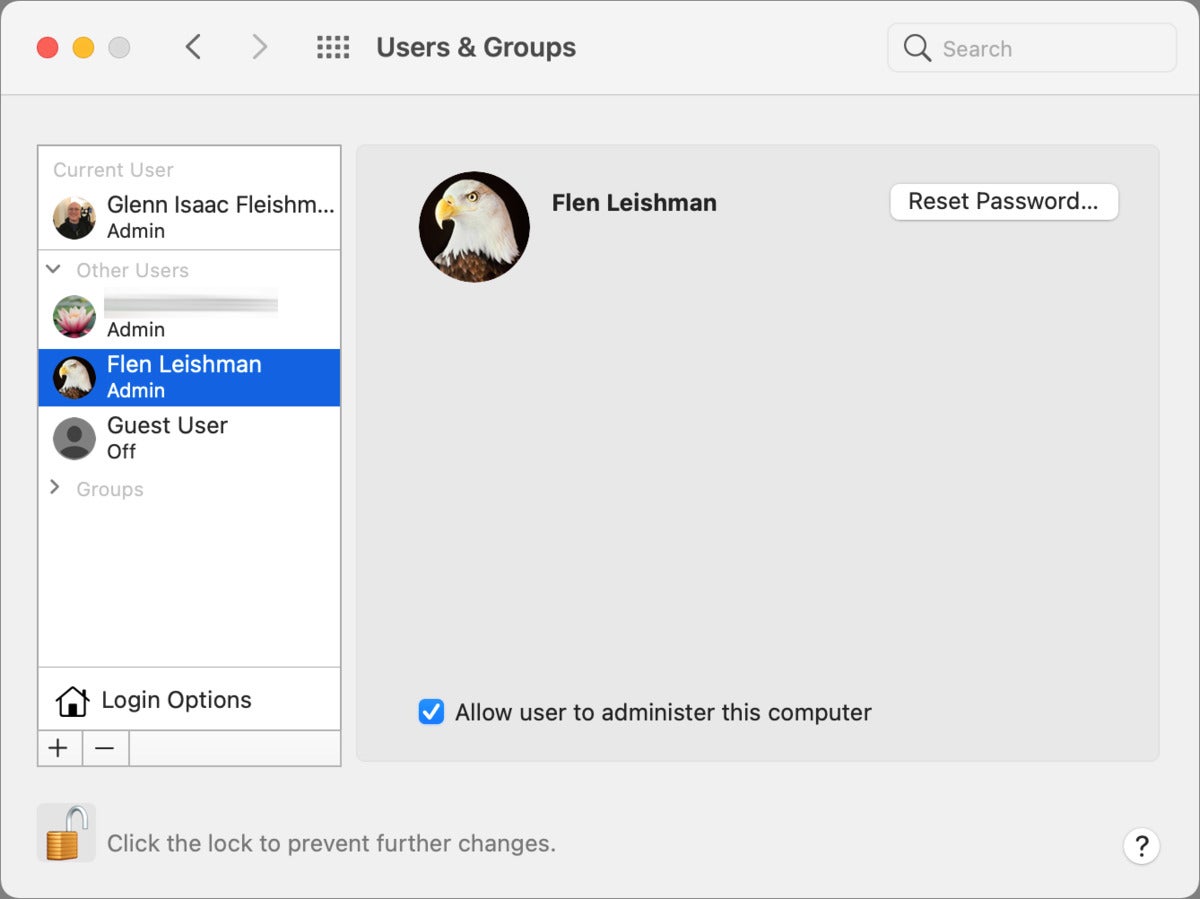
With an existing account you want to elevate to an administrator:
- Open the Users & Groups preference pane.
- Click the lock icon at the lower-left corner and authenticate yourself.
- Select the account in the list at left.
- Check the box "Allow the user to administer this computer."
- macOS notes that you have to restart your Mac for that to take effect; do so.
 IDG
IDG You can upgrade an existing account to have administrator privileges.
Once logged into a different account than the one you're changing and out of the account you're changing (if you have fast-user switching enabled), you can proceed.
If you want to change the folder name in the Users directory for your account, start by following these steps; it's optional:
- If you're sharing that user directory, start in the Sharing preference pane, select the File Sharing item in the left-hand menu, click the shared folder in Shared Folders, and click the – (minus sign) to remove it.
- Now, in the Finder, choose Go > Go to Folder and type in
/Users/and click Go. - Rename the account folder without any spaces.
- Enter the current account's password when prompted.
Now you can proceed to the account's full name. (Warning! Changing any other item than those noted in these steps could cause problems.)
- Open the Users & Groups preference pane.
- Click the lock icon at the lower-left corner and authenticate yourself.
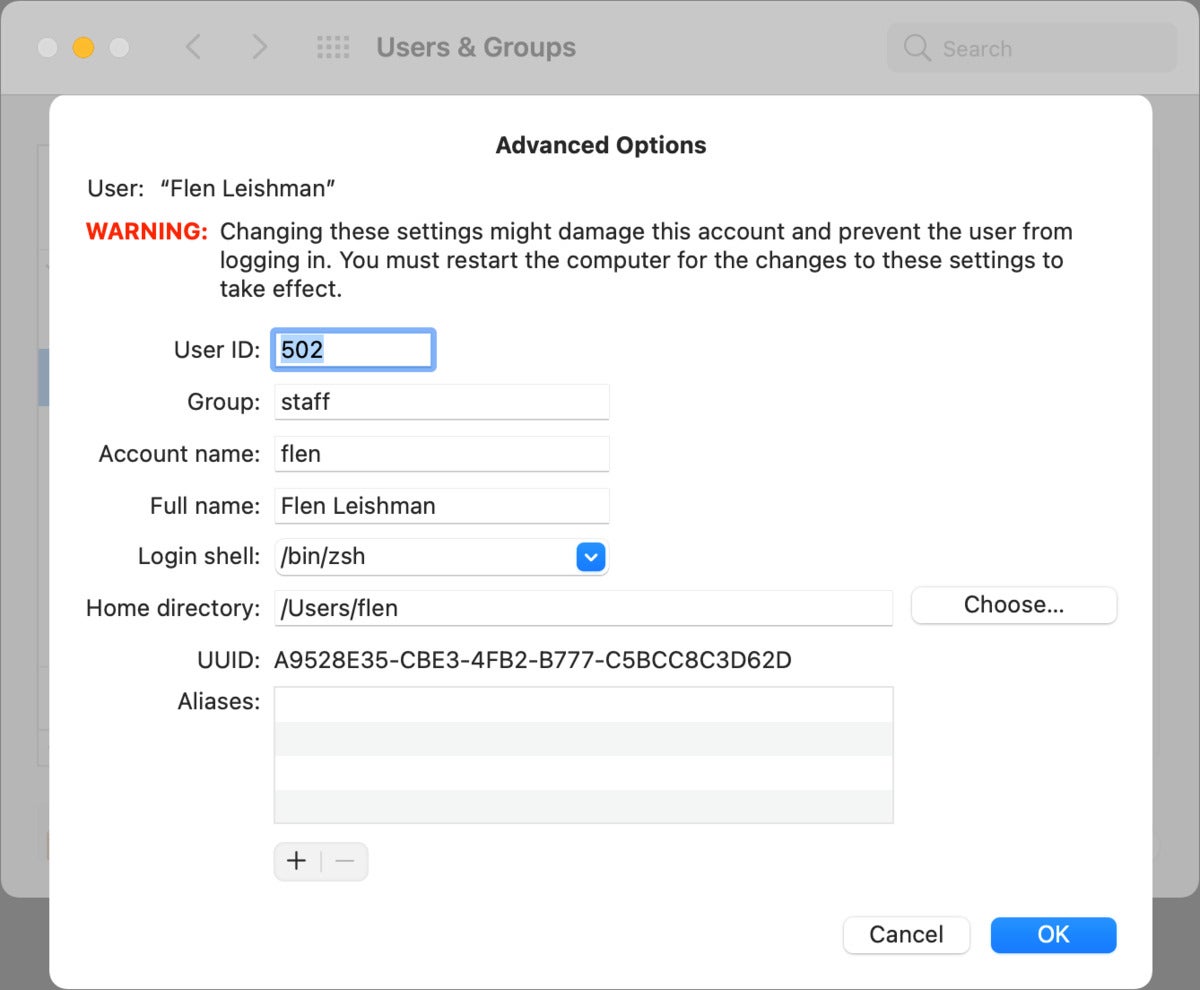
- Control-click the account name to change and select Advanced Options.
- Carefully change the "Full name" field.
- If you changed the Users directory for the account above, change the "Home directory" field to exactly match what you entered after
/Users/(you can also click Choose and navigate to the new folder to avoid having to type it in). - Click OK.
- Restart the Mac.
- Log into your account, which should now show the updated name.
 IDG
IDG Advanced Options for a user account lets you change the account's display name (Full name) and path to the user's directory.
This Mac 911 article is in response to a question submitted by Macworld reader Moon.
Ask Mac 911
We've compiled a list of the questions we get asked most frequently along with answers and links to columns: read our super FAQ to see if your question is covered. If not, we're always looking for new problems to solve! Email yours to mac911@macworld.comincluding screen captures as appropriate, and whether you want your full name used. Not every question will be answered, we don't reply to email, and we cannot provide direct troubleshooting advice.
Note: When you purchase something after clicking links in our articles, we may earn a small commission. Read our affiliate link policy for more details.
- Related:
- MacOS
- Mac
Source: https://www.macworld.com/article/234880/how-to-change-your-name-on-your-macs-user-account.html
Posted by: keanwhernswille.blogspot.com
0 Response to "How to Change Your Name on a Macbook Pro"
Post a Comment